
This tutorial will show you the skeleton of an Android application that uses the Gradle build system and runs Robolectric JUnit tests on Android classes.

This follows on from my tutorial about JVM JUnit tests, you can have one type of testing without the other. For instance you could bundle all your JVM tests inside this robolectric module I am going to show you, but separating your test types allows you to run them independently (as JVM tests run considerably faster than Robolectric) and also the separation of modules increases the SRP of your code and gives you a more SOLID application.
There are a few ways you can run Robolectric tests with a Gradle project. You could use J Whartons Gradle Android test plugin or the Novoda Gradle Android test plugin. But I want to show you what these do under the hood and configuring it yourself will allow you to understand what is going on and react to changes from the Android Gradle plugin team & the Gradle team as they seem to be updating this stuff constantly!
First off we create a new module for running our tests. Currently it isn’t possible to integrate Robolectric tests into the same module as your Android application. This is a limitation with compiling the SDK I believe. So we have to create another module specifically for robolectric tests. This is a Java only module but as you’ll see we will compile in the Android SDK so that we can get the correct references to the code.

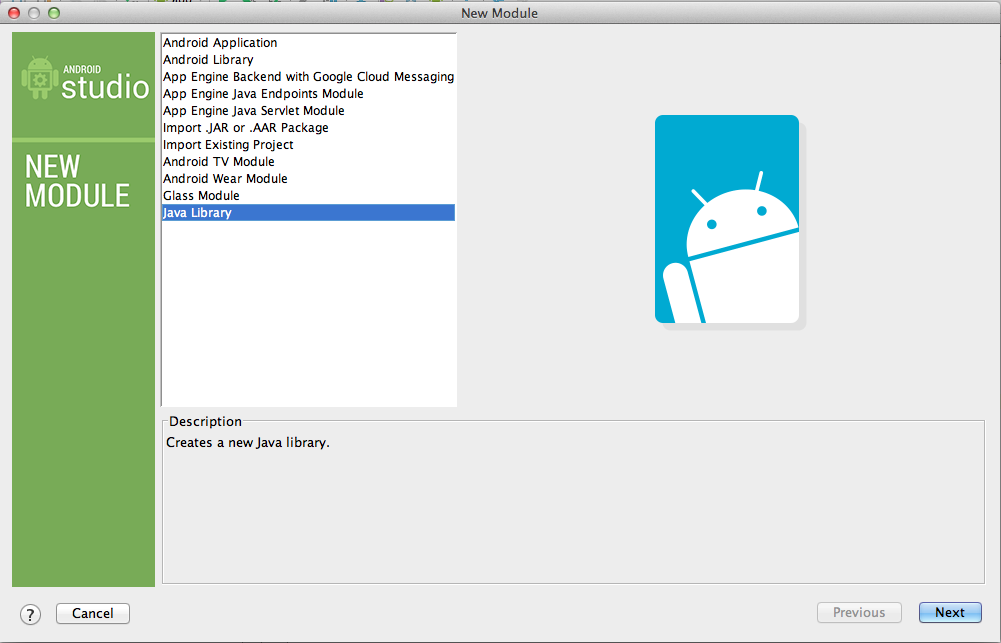
Once you have done this, your settings.gradle file will be updated showing the new module. This lets gradle know the module exists.
[code language=”groovy”]
include ‘:app’, ‘:robolectric-tests’
[/code]
The second thing you need to do is add all the dependencies from the app (Android module) to the robolectric-tests module. This allows the robolectric module to see all of your application classes so that you can reference your own code when testing (very handy!).
You also need to add the dependencies to JUnit & Robolectric itself.
If you look at robolectric-tests module build.gradle below it may seem a bit confusing but let me explain line by line.
First we open the dependencies closure. We then create a variable to show where our application module is located. Then we compile our application. Next we ask our application what gradle application variant (flavor & build type combination) do you have (i.e. debug/release) and we select the first of these and compile all it’s dependencies. We then compile the applications variants output files. Then we get the android plugin from our application and ensure we compile anything on the boot time classpath. Once we have all these, we have enough for references to Android & to our application in order to compile & run Robolectric JUnit tests.
This is done in your robolectric-tests modules build.gradle:
[code language=”groovy”]
dependencies {
def androidModule = project(‘:app’)
compile androidModule
testCompile androidModule.android.applicationVariants.toList().first().javaCompile.classpath
testCompile androidModule.android.applicationVariants.toList().first().javaCompile.outputs.files
testCompile files(androidModule.android.getBootClasspath())
testCompile ‘junit:junit:4.+’
testCompile ‘org.robolectric:robolectric:2.2’
}
[/code]
Note. about the above, because the android-gradle plugin is in beta they can do radical changes with no backwards compatibility. For example getBootClasspath() used to be runtimeJarList() and the name of the plugin has just changed in the latest release from “android” to “com.android.application”. This is the benefit of doing it yourself, you can react faster to these changes rather than waiting for a 3rd party plugin release.
Now you’ll want to set up your robolectric-tests java module for testing. It is still a java module therefore tests sit in /test/java .

Finally you will need to create a custom test runner in order to tell Robolectric where your AndroidManifest and resources sit. I have done so below, but take note that the paths are hardcoded here, so if you change your project structure remember this. There was also a second issue that Robolectric would not compile against Android SDK 19 or 20 and therefore we have overridden the AndroidManifests target SDK to always be 18.
[code language=”java” collapsed=”true”]
package com.blundell;
import org.junit.runners.model.InitializationError;
import org.robolectric.AndroidManifest;
import org.robolectric.RobolectricTestRunner;
import org.robolectric.annotation.Config;
import org.robolectric.res.Fs;
public class RobolectricGradleTestRunner extends RobolectricTestRunner {
private static final int MAX_SDK_SUPPORTED_BY_ROBOLECTRIC = 18;
public RobolectricGradleTestRunner(Class<?> testClass) throws InitializationError {
super(testClass);
}
@Override
protected AndroidManifest getAppManifest(Config config) {
String manifestProperty = "../app/src/main/AndroidManifest.xml";
String resProperty = "../app/src/main/res";
return new AndroidManifest(Fs.fileFromPath(manifestProperty), Fs.fileFromPath(resProperty)) {
@Override
public int getTargetSdkVersion() {
return MAX_SDK_SUPPORTED_BY_ROBOLECTRIC;
}
};
}
}
[/code]
To use your TestRunner you annotate your test class. If you ever forget to do this annotation the error you are most likely to get is the famous Stub! issue, so remember this.
Here is an example test:
[code language=”java” collapsed=”true”]
package com.blundell.tests;
import android.view.View;
import com.blundell.RobolectricGradleTestRunner;
import org.junit.Test;
import org.junit.runner.RunWith;
import org.robolectric.util.ActivityController;
import static org.junit.Assert.assertEquals;
@RunWith(RobolectricGradleTestRunner.class)
public class MyAndroidClassTest {
@Test
public void testWhenActivityCreatedHelloTextViewIsVisible() throws Exception {
MyActivity activity = new MyActivity();
ActivityController.of(activity).attach().create();
int visibility = activity.findViewById(R.id.my_hello_text_view).getVisibility();
assertEquals(visibility, View.VISIBLE);
}
}
[/code]
We create our activity, ensure it has called onCreate, then we find a TextView that was in our XML layout & assert that it is visible. I won’t go into more detail as the Robolectric site itself is a great resource.
Thats it! To run your tests you can use one of these:
- ./gradlew test
- ./gradlew check
- ./gradlew build
test just runs your tests, check would run tests plus checkstyle etc, and build compiles everything & checks & tests
You can also run the tests from inside ASide which I have written up here.
Source Code
The example project is available on GitHub Check it out here
Comments or questions just post below.
Comments
20 responses to “[TUT] Android Gradle App with Robolectric JUnit tests”
Hi,
I had the robolectric tests inside my project and now I want split like you did.
My structure is something like:
-app
build.gradle
-pullToRefresh
build.gradle
-robolectric-test
build.gradle
build.gradle
I have this error and I don’t know why:
“Could not find property ‘android’ on project ‘:app’”
The android property exist with the different builds in the app->build.gradle
I found the issue, the problem was the order of the evaluation, my main project start with “T” and robolectric module start with “R”.
The solution was add in the robolectric-tests->build.gradle that line “evaluationDependsOn(‘:theMainProject’)” at the beginning
Thanks!
Thanks! It would be really helpful to have that in the post too 🙂
Has anybody successfully followed these instructions on Android Studio v0.8.0 or above? I’m hitting various errors.
Opening the sample project from Github results in an IDE error, or it only shows the gradle folder from the project, so I wasn’t able to check if that works for me.
I’m also wondering why this tutorial specifically uses Robolectric 2.2. Version 2.3 has been out since May:
https://github.com/robolectric/robolectric/releases
Yes this works on all 0.8.+ builds of ASide. Your errors may be ASide itself needs a re-install, it is beta & fails to update correctly sometimes.
It uses 2.2 as that was the Robolectric version at the time, however it should work fine with 2.3 as well.
That’s a good tutorial but I think it should also address the main problem with Gradle and robolectric : how to run them from within android studio.
A couple of methods used to work fine but I can’t find a way to do it any more, and even less a way that could be durable.
Thx if someone can find a solution for this.
Hi blundell, any news on this? I’m also struggling on make it working under Android Studio IDE.
Here you go Stéphane: https://blog.blundell-apps.com/how-to-run-robolectric-junit-tests-in-android-studio/