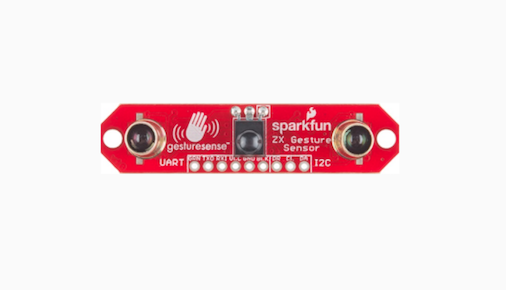
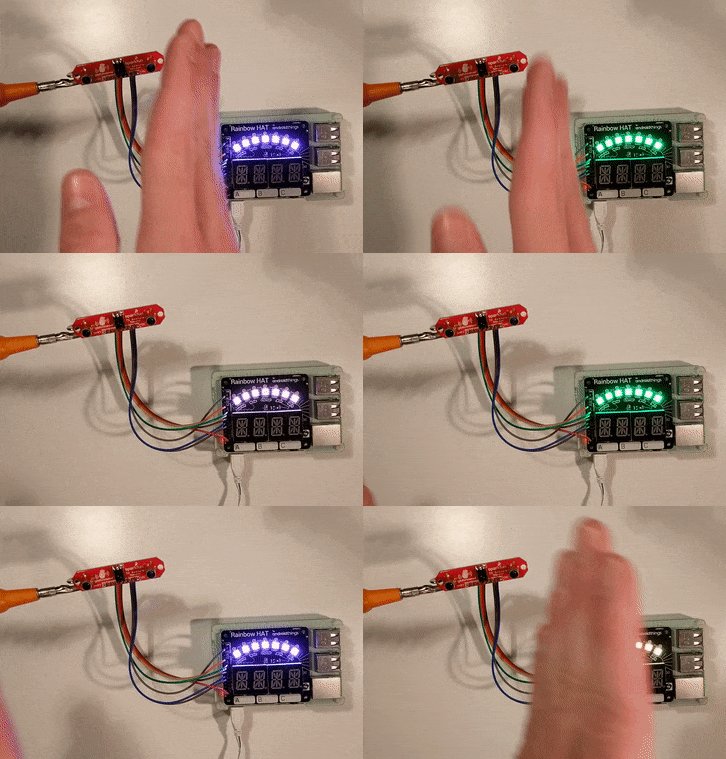
This blog post is going to show you how you can use the UART protocol to output from your AndroidThings application. We will attach a ZX Sensor and detect some movement hand gestures, minority report style. We’ll use swipe gestures to change our Rainbow Hat LEDs through a range of colours.
Hardware Prerequisite:
We have the Rainbow Hat connected to the top of our raspberry pi.
We have the ZXSensor wired into the UART pins of the rainbow hat.
Software Prerequisite:
An AndroidThings project already set up in Android Studio, if you aren’t sure how to get your project to this point you can view the ‘first Android Things app’ blog for instructions.
Let’s get started.
Note: All the specific information about this gesture sensor that we are about to discuss, if you are looking for it as a reference, is in the ZXSensor datasheet here.
First we create an instance of PeripheralManagerService. This is the AndroidThings SDK class that allows us to open connections to different board pins using the different available protocols.
PeripheralManagerService service = new PeripheralManagerService();
Using this instance, we want to open an UART connection, the open method takes one parameter, this is the name of the UART bus you want to use. The UART pins on the top of the Rainbow Hat are know as “UART0”.
public class MainActivity extends Activity {

    private static final String GESTURE_SENSOR = "UART0";

    private UartDevice bus;

    @Override
    protected void onCreate(Bundle savedInstanceState) {
        super.onCreate(savedInstanceState);

        try {
            PeripheralManagerService service = new PeripheralManagerService();
            bus = service.openUartDevice(GESTURE_SENSOR);
        } catch (IOException e) {
            throw new IllegalStateException(GESTURE_SENSOR + " cannot be connected to.", e);
        }

  }
}
Since we opened the connection to our pin in the onCreate method, we should use the symmetrically matching pair from the Android Lifecycle to close the connection.
    @Override
    protected void onDestroy() {
        try {
            bus.close();
        } catch (IOException e) {
            Log.e("TUT", GESTURE_SENSOR + " connection cannot be closed.", e);
        }
        super.onDestroy();
    }
The datasheet tells us whenever we configure a UART bus we need to set the baud rate, data size, parity and stop bits. Baud is the speed of communication, data size is how many bits are expected at once, parity is way to ensure the integrity of the data and stop bits can be used for a time interval between transmissions.
From the datasheet we can see the baud rate is 115,200. The databits are 8, there is no parity and no stop bits. Let’s configure that in oncreate:
        try {
            bus.setBaudrate(115200);
            bus.setDataSize(8);
            bus.setParity(UartDevice.PARITY_NONE);
            bus.setStopBits(1);
        } catch (IOException e) {
            throw new IllegalStateException(GESTURE_SENSOR + " cannot be configured.", e);
        }
The UART api has a callback called Uart Device Callback. This callback is invoked when there is data available to read. Add this callback to your Activity.
    private final UartDeviceCallback onUartBusHasData = new UartDeviceCallback() {
        @Override
        public boolean onUartDeviceDataAvailable(UartDevice uart) {
	// react to gestures here later
        }
   }
Let’s register our interest in listening to data from the zx sensor. We register in onStart, and unregister in onStop. With this code.
    @Override
    protected void onStart() {
        super.onStart();
        try {
            bus.registerUartDeviceCallback(onUartBusHasData);
        } catch (IOException e) {
            throw new IllegalStateException("Cannot listen for input from " + GESTURE_SENSOR, e);
        }
    }

    @Override
    protected void onStop() {
        bus.unregisterUartDeviceCallback(onUartBusHasData);
        super.onStop();
    }
Once we have registered, we can read data from the device inside the on uart device data available method.
The datasheet explains to us that we will be sent a Message Code of 1 byte, followed by a data payload. The data payload has a maximum size of two bytes. Therefore we can read the UARTs device buffer with this code, making sure our buffer has a maximum size of 3 bytes.
    private final UartDeviceCallback onUartBusHasData = new UartDeviceCallback() {
        @Override
        public boolean onUartDeviceDataAvailable(UartDevice uart) {
            try {
                byte[] buffer = new byte[3];
                while ((uart.read(buffer, buffer.length)) > 0) {
                     // TODO handleGestureSensorEvent(buffer);
                }
            } catch (IOException e) {
                Log.e("TUT", "Cannot read device data.", e);
            }

            return true;
        }
}
We want to detect swipe left and swipe right gestures. The datasheet tells us that any data we receive with the message code 0xFC will be a gesture event.
** SHOW datasheet page 6, gestures table **
Then, when we receive the 0xFC message code, the payload will contain 0x1 for a swipe right or 0x2 for a swipe left. Followed by another byte for the speed of the swipe. Handling the gesture event. The code looks like this:
    private static final byte MSG_CODE_GESTURE_EVENT = (byte) 0xFC;
    private static final byte GESTURE_CODE_SWIPE_RIGHT_EVENT = 0x01;
    private static final byte GESTURE_CODE_SWIPE_LEFT_EVENT = 0x02;

        private void handleGestureSensorEvent(byte[] payload) {
            byte messageCode = payload[0];
            if (messageCode != MSG_CODE_GESTURE_EVENT) {
                return;
            }
            byte gestureCode = payload[1];
            if (gestureCode == GESTURE_CODE_SWIPE_RIGHT_EVENT) {
                // react to swipe right
            } else if (gestureCode == GESTURE_CODE_SWIPE_LEFT_EVENT) {
                // react to swipe left
            }
        }
When a gesture event happens let’s give ourselves some visual feedback. Here I have created a class called LedStrip that will turn the rainbowhat LEDs on and off. If you are interested in the details, check out this LedStrip.java class.
We setup this ledStrip in the onCreate. And tear it down in the onDestroy.
// as a field
private final LedStrip ledStrip = new LedStrip();
// in onCreate
ledStrip.setUp();
// in onDestroy
ledStrip.tearDown();
Now when we get a swipe right we will tell the LED strip to change to the next color, and if we get a swipe left we’ll go back to the previous colour.
            if (gestureCode == GESTURE_CODE_SWIPE_RIGHT_EVENT) {
               ledStrip.nextColor();
            } else if (gestureCode == GESTURE_CODE_SWIPE_LEFT_EVENT) {
               ledStrip.previousColor();
            }
If you want to see the all the parts joined together, expand the Activity below:
import android.app.Activity;
import android.os.Bundle;
import android.util.Log;

import com.google.android.things.pio.PeripheralManagerService;
import com.google.android.things.pio.UartDevice;
import com.google.android.things.pio.UartDeviceCallback;

import java.io.IOException;

public class MainActivity extends Activity {

    private static final String GESTURE_SENSOR = "UART0";
    private static final byte MSG_CODE_GESTURE_EVENT = (byte) 0xFC;
    private static final byte GESTURE_CODE_SWIPE_RIGHT_EVENT = 0x01;
    private static final byte GESTURE_CODE_SWIPE_LEFT_EVENT = 0x02;

    private final LedStrip ledStrip = new LedStrip();

    private UartDevice bus;

    @Override
    protected void onCreate(Bundle savedInstanceState) {
        super.onCreate(savedInstanceState);
        ledStrip.setUp();

        try {
            PeripheralManagerService service = new PeripheralManagerService();
            bus = service.openUartDevice(GESTURE_SENSOR);
        } catch (IOException e) {
            throw new IllegalStateException(GESTURE_SENSOR + " cannot be connected to.", e);
        }

        try {
            bus.setBaudrate(115200);
            bus.setDataSize(8);
            bus.setParity(UartDevice.PARITY_NONE);
            bus.setStopBits(1);
        } catch (IOException e) {
            throw new IllegalStateException(GESTURE_SENSOR + " cannot be configured.", e);
        }
    }

    @Override
    protected void onStart() {
        super.onStart();
        try {
            bus.registerUartDeviceCallback(onUartBusHasData);
        } catch (IOException e) {
            throw new IllegalStateException("Cannot listen for input from " + GESTURE_SENSOR, e);
        }
    }

    private final UartDeviceCallback onUartBusHasData = new UartDeviceCallback() {
        @Override
        public boolean onUartDeviceDataAvailable(UartDevice uart) {
            try {
                byte[] buffer = new byte[3];
                while ((uart.read(buffer, buffer.length)) > 0) {
                    handleGestureSensorEvent(buffer);
                }
            } catch (IOException e) {
                Log.e("TUT", "Cannot read device data.", e);
            }

            return true;
        }

        private void handleGestureSensorEvent(byte[] payload) {
            byte messageCode = payload[0];
            if (messageCode != MSG_CODE_GESTURE_EVENT) {
                return;
            }
            byte gestureCode = payload[1];
            if (gestureCode == GESTURE_CODE_SWIPE_RIGHT_EVENT) {
                ledStrip.nextColor();
            } else if (gestureCode == GESTURE_CODE_SWIPE_LEFT_EVENT) {
                ledStrip.previousColor();
            }
        }

        @Override
        public void onUartDeviceError(UartDevice uart, int error) {
            Log.e("TUT", "ERROR " + error);
        }
    };

    @Override
    protected void onStop() {
        bus.unregisterUartDeviceCallback(onUartBusHasData);
        super.onStop();
    }

    @Override
    protected void onDestroy() {
        ledStrip.tearDown();
        try {
            bus.close();
        } catch (IOException e) {
            Log.e("TUT", GESTURE_SENSOR + " connection cannot be closed.", e);
        }
        super.onDestroy();
    }
}
That’s it! You now understand how the Android Things UART communication with peripherals works.
You can now interface with a gesture sensor reading its buffers and configuring the UART device to identify gestures. This knowledge transfers to reading other datasheets and coding other UART peripherals such as printers, GPS devices or LCD displays.
The source is on GitHub and all the code is available here.
If you are more of an audible learning, or prefer video content. You can check out my Android Things introductory video course on Caster.io.

