This blog will show you how to write an Android Things driver for the HC-SR501 PIR Sensor Module. This module can detect movement and uses a GPIO pin on your Android Things board for communication.
What are we going to do:
– Understand how HC-SR501 PIR Sensor Module works
– Write a MotionSensor interface for how we want to communicate
– Use GPIO to track movement
note: PIR stands for Passive Infra-Red.
Ok let’s do it.
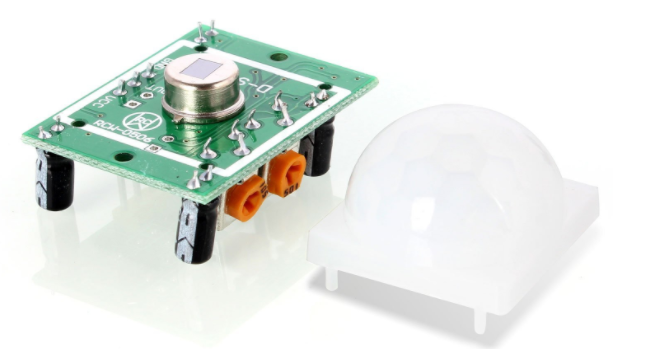
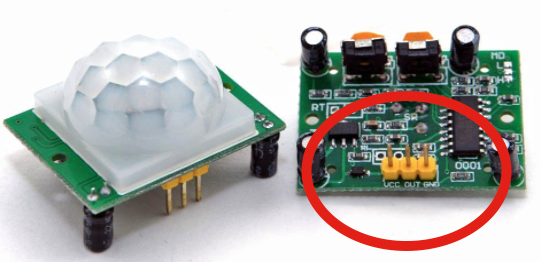
This is what the sensor peripheral looks like. The two orange dials on the front (called potentiometers) allow you to manually adjust the sensitivity and allow you to adjust the time between movement event triggers. There are also pins on the bottom that would allow you to change the sensor to be only triggered once (default is to trigger over an over) and we won’t be using that. You can find more information about the sensor on the DataSheet. Click here for HC-SR501-datasheet PDF.
There are 3 pins on the bottom of the sensor. They are for VCC, OUT and GND. VCC is your power pin and should be connected to 3.3v. GND should be connected to ground and OUT is the GPIO pin that should be connected to any GPIO pin on your Android Things board.
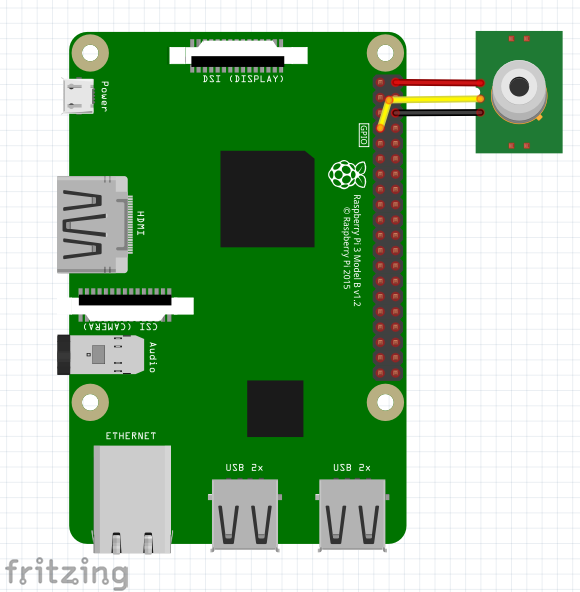
We will use a Raspberry Pi 3 for Android Things as shown below. Once this is done your sensor is setup and ready to work with Android Things. Lets look at some code.
The pin for receiving data from the motion sensor is a GPIO pin this means we will be using the GPIO Apis as documented here. We will receive a high voltage signal when the sensor detects movement, but before we dive into that. Lets talk about what we expect from out motion sensor.
Being a motion sensor, we want to know when movement is detected. For now we don’t care about the direction or speed of the movement, nor do we care about how GPIO works or how the motion sensor is reset. All we want to know is, did we detect movement, a listener to tell us this would be great. We also want to start monitoring and stop monitoring. Lets start off with an Interface that describes this contract for what we want. That way when we create the driver we can enforce the contract and keep our code that little bit cleaner:
MotionSensor.java
interface MotionSensor {

    void startup();

    void shutdown();

    interface Listener {
        void onMovement();
    }

}
Now that we have declared an interface for what we want from our apps side. Lets investigate GPIO for attaching our Listener to get the data from the sensor.
When using the GPIO bus we need to set three things. Direction, Active Type & Edge Trigger.
- Direction – What direction we expect data to travel. This is a sensor so we expect it to send us data. Therefore we will use
Gpio.DIRECTION_IN. - Active Type – GPIO is binary (true or false) so we are declaring what voltage signal equates to true, a low or high voltage. For our sensor according to the datasheet a high voltage means movement. Therefore we will use
Gpio.ACTIVE_HIGH. - Edge Trigger – This is what state change we want monitor, from high voltage to low, low to high or both. Meaning we could listen for movement starting, ending or both. We want to listen for movement starting. Therefore we will use
Gpio.EDGE_RISING.
After setting up the GPIO pin we have to set a listener to capture the edge rising. This is done using the registerGpioCallback method.
Configuring our sensor startup now looks like this:
    @Override
    public void startup() {
        try {
            bus.setDirection(Gpio.DIRECTION_IN);
            bus.setActiveType(Gpio.ACTIVE_HIGH);
            bus.setEdgeTriggerType(Gpio.EDGE_RISING);
        } catch (IOException e) {
            throw new IllegalStateException("Sensor can't start - App is foobar'd", e);
        }
        try {
            bus.registerGpioCallback(callback);
        } catch (IOException e) {
            throw new IllegalStateException("Sensor can't register callback - App is foobar'd", e);
        }
    }
The callback in question is an AndroidThings class called GpioCallback. Because we used setEdgeTriggerType(Gpio.EDGE_RISING) , onGpioEdge will be called when the voltage over the GPIO pin goes from low to high i.e. we detect movement. When this is triggered we pass on the event to our listener.
    private final GpioCallback callback = new GpioCallback() {
        @Override
        public boolean onGpioEdge(Gpio gpio) {
            listener.onMovement();
            return true; // True to continue listening
        }
    };
It is best practice with GPIO to unregister these callbacks, we’ll do this in the shutdown method. As well as closing our bus so that the GPIO can be reused next time the app is started.
    @Override
    public void shutdown() {
        bus.unregisterGpioCallback(callback);
        try {
            bus.close();
        } catch (IOException e) {
            Log.e("TUT", "Failed to shut down. You might get errors next time you try to start.", e);
        }
    }
Now we have the code to start monitoring for movement, callbacks for when movement is detected and stopping monitoring. Here is the code for the full class:
/**
 * HC-SR501
 */
class PirMotionSensor implements MotionSensor {

    private final Gpio bus;

    private final MotionSensor.Listener listener;

    PirMotionSensor(Gpio bus, Listener listener) {
        this.bus = bus;
        this.listener = listener;
    }

    @Override
    public void startup() {
        try {
            bus.setDirection(Gpio.DIRECTION_IN);
            bus.setActiveType(Gpio.ACTIVE_HIGH);
            bus.setEdgeTriggerType(Gpio.EDGE_RISING);
        } catch (IOException e) {
            throw new IllegalStateException("Sensor can't start - App is foobar'd", e);
        }
        try {
            bus.registerGpioCallback(callback);
        } catch (IOException e) {
            throw new IllegalStateException("Sensor can't register callback - App is foobar'd", e);
        }
    }

    private final GpioCallback callback = new GpioCallback() {
        @Override
        public boolean onGpioEdge(Gpio gpio) {
            listener.onMovement();
            return true; // True to continue listening
        }
    };

    @Override
    public void shutdown() {
        bus.unregisterGpioCallback(callback);
        try {
            bus.close();
        } catch (IOException e) {
            Log.e("TUT", "Failed to shut down. You might get errors next time you try to start.", e);
        }
    }

}
Now we have a fully functioning Motion Sensor UserDriver lets hook it up to the Activity. Remember that depending on which pin (and which board you use) the pin for the openGpio method will be different than I use here.
public class AndroidThingsActivity extends Activity implements MotionSensor.Listener {

    private PirMotionSensor motionSensor;

    @Override
    protected void onCreate(Bundle savedInstanceState) {
        super.onCreate(savedInstanceState);

        Gpio bus = openMotionSensorGpioBus();
        motionSensor = new PirMotionSensor(bus, this);
        motionSensor.startup();
    }

    private Gpio openMotionSensorGpioBus() {
        Gpio bus;
        try {
            // BCM4 is the GPIO pin I have the sensor connected to on my raspberry pi
            bus = new PeripheralManagerService().openGpio("BCM4");
        } catch (IOException e) {
            throw new IllegalStateException("Can't open GPIO - can't create app.", e);
        }
        return bus;
    }

    @Override
    public void onMovement() {
        Log.d("TUT", "MOVEMENT DETECTED");
    }

    @Override
    protected void onDestroy() {
        motionSensor.shutdown();
        super.onDestroy();
    }
}
And thats it! Your Activity will send a message to the log everytime a movement is detected. There will be a delay between these log messages and if you want to speed up or slow down this delay you can adjust the hardware potentiometer that we talked about at the beginning of this blog.
Any questions just ask.
All source code is on GitHub here.
Hi,
We tried to use your code and connect it to a PIR with no success. We thought the PIR might be faulty and bought a second PIR however we had the same problem. We have been able to get all our sensors working on our RainbowHAT. Are you able to provide any troubleshooting or tips on how we might get our PIR working.
Hi Mark, sorry for the late reply. did you get it working in the end? You can reach out to me on Twitter or ask on stackoverflow and link me
Great explanation. Easy to follow. Thanks.