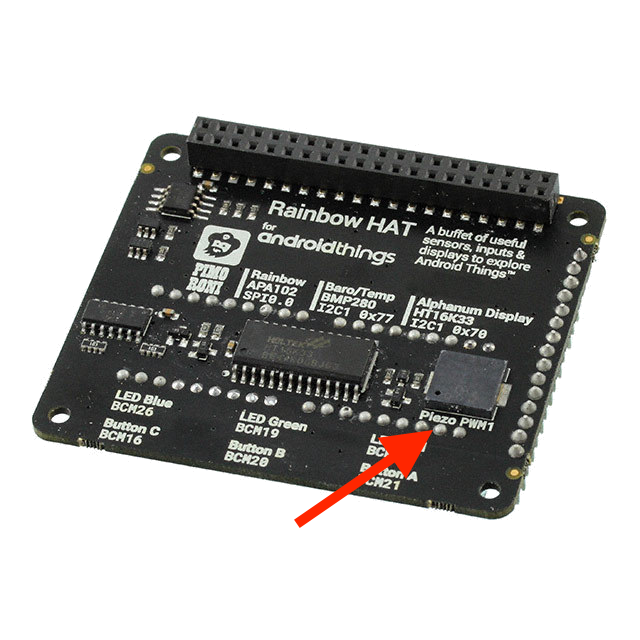
This blog will show you how to play the Pokemon theme tune using the PWM protocol through the peripheral buzzer. We’ll discuss the Raspberry Pi Rainbow hat and its Piezo Transducer which is a buzzer that we can make play sounds, notes or noises.
Hardware Prerequisite:
We have the Rainbow Hat connected to the top of our raspberry pi.
Software Prerequisite:
An AndroidThings project already set up in Android Studio, if you aren’t sure how to get your project to this point you can view the ‘first Android Things app’ blog for instructions.
Let’s get started.
First we create an instance of PeripheralManagerService. This is the AndroidThings SDK class that allows us to open connections to different board pins using the different available protocols.
PeripheralManagerService service = new PeripheralManagerService();
Using this instance, we want to open a PWM connection with the pin address of the Piezzo Transducer. This can be found here. When we open this connection we are given back a PWM bus variable that will now allow us to communicate using the AndroidThings SDK PWM class.
public class MainActivity extends Activity {

   private static final String BUZZER_PIN = "PWM1";

  private Pwm bus;

   @Override
   protected void onCreate(Bundle savedInstanceState) {
       super.onCreate(savedInstanceState);

       PeripheralManagerService service = new PeripheralManagerService();
       try {
           bus = service.openPwm(BUZZER_PIN);
       } catch (IOException e) {
           throw new IllegalStateException(BUZZER_PIN + " bus cannot be opened.", e);
       }
   }
}
Since we opened the connection to our pin in the onCreate method, we should use the symmetrically matching pair from the Android Lifecycle to close the connection. Therefore we close the PWM bus connection in onDestroy using this code.
@Override
protected void onDestroy() {
   try {
       bus.close();
   } catch (IOException e) {
       Log.e("TUT", BUZZER_PIN + " bus cannot be closed, you may experience errors on next launch.", e);
   }
   super.onDestroy();
}
The piezo buzzer works by us sending a repeating pulse at different frequencies to produce different sounds. The duty cycle describes the width of the pulse inside of the frequency and for a buzzer this equates to the volume of the sound. The duty cycle api takes a percentage between 0 and 100. We select 50 percent as this equates to the buzzer being at it loudest.
 // onCreate
…
try {
   bus.setPwmDutyCycle(50);
} catch (IOException e) {
   throw new IllegalStateException(BUZZER_PIN + " bus cannot be configured.", e);
}
A quick note about music. Musical notes require two things, a pitch and a period. The pitch is the sound the note makes and the period is for how long that sound is made.
We are going to play the Pokemon theme tune on this buzzer. For those of you who don’t read music I have done you the courtesy of converting this music sheet into java code.
You don’t need to understand this class to understand the aims of this blog post (so don’t worry), but it’s an interesting side note about music:
interface Music {
    Duration EIGTH = new Duration(0.125);
    Duration QUARTER = new Duration(0.25);
    Duration HALF = new Duration(0.5);
    Duration WHOLE = new Duration(1);

    Frequency C4 = new Frequency(261.63);
    Frequency E4 = new Frequency(329.63);
    Frequency F4 = new Frequency(349.23);
    Frequency G4 = new Frequency(392.00);
    Frequency A4 = new Frequency(440.00);
    Frequency A4_SHARP = new Frequency(466.16);

    Note E4_Q = new FrequencyNote(QUARTER, E4);
    Note F4_Q = new FrequencyNote(QUARTER, F4);
    Note G4_Q = new FrequencyNote(QUARTER, G4);
    Note G4_H = new FrequencyNote(HALF, G4);
    Note A4_Q = new FrequencyNote(QUARTER, A4);
    Note A4_Q_SHARP = new FrequencyNote(QUARTER, A4_SHARP);
    Note A4_E = new FrequencyNote(EIGTH, A4);
    Note A4_W = new FrequencyNote(WHOLE, A4);
    Note C4_Q = new FrequencyNote(QUARTER, C4);
    Note R_E = new RestNote(EIGTH);
    Note R_H = new RestNote(HALF);

    /**
     * https://www.musicnotes.com/sheetmusic/mtd.asp?ppn=MN0145355
     */
    List<Note> POKEMON_ANIME_THEME = new ArrayList<>(Arrays.asList(
        R_E, A4_E, A4_E, A4_E, A4_Q, A4_Q,
        G4_Q, E4_Q, C4_Q, C4_Q,
        A4_Q, A4_Q, G4_Q, F4_Q,
        G4_H, R_H,
        F4_Q, A4_Q_SHARP, A4_Q_SHARP, A4_Q_SHARP,
        A4_Q, G4_Q, F4_Q, F4_Q,
        A4_Q, A4_Q, G4_Q, F4_Q,
        A4_W
    ));

    class Duration {
        private static final long TEMPO = TimeUnit.MILLISECONDS.toMillis(1500);

        private final double beatPercent;

        private Duration(double beatPercent) {
            this.beatPercent = beatPercent;
        }

        long asPeriod() {
            return (long) (TEMPO * beatPercent);
        }

    }

    class Frequency {

        private final double frequency;

        private Frequency(double frequency) {
            this.frequency = frequency;
        }

        double getFrequency() {
            return frequency;
        }
    }

    interface Note {
        long getPeriod();

        double getFrequency();

        boolean isRest();
    }

    class FrequencyNote implements Note {
        private final Duration duration;
        private final Frequency frequency;

        private FrequencyNote(Duration duration, Frequency frequency) {
            this.duration = duration;
            this.frequency = frequency;
        }

        @Override
        public long getPeriod() {
            return duration.asPeriod();
        }

        @Override
        public double getFrequency() {
            return frequency.getFrequency();
        }

        @Override
        public boolean isRest() {
            return false;
        }
    }

    class RestNote implements Note {
        private final Duration duration;

        private RestNote(Duration duration) {
            this.duration = duration;
        }

        @Override
        public long getPeriod() {
            return duration.asPeriod();
        }

        @Override
        public double getFrequency() {
            throw new IllegalStateException("Rest notes do not have a frequency");
        }

        @Override
        public boolean isRest() {
            return true;
        }
    }
}
Now we have our buzzer’s volume configured and our music ready to play.
Let’s setup our music loop so we can play some notes. In the Main Activity in our on create method we create a Handler Thread. To post runnables to the HandlerThread we create a Handler that requires the looper from our HandlerThread. It looks like this.
// onCreate
...
HandlerThread handlerThread = new HandlerThread("BackgroundThread");
handlerThread.start();
buzzerSongHandler = new Handler(handlerThread.getLooper());
Using this Handler architecture, allows us to communicate with our buzzer peripheral off of the main thread and so have full control of when we send notes. This is important for our note playing buzzer because we are going to post a runnable each time we want a note played and then pause the thread waiting for it to finish playing. This keeps a nice constant speed and will ensure a smooth playing and listening experience.
Let’s play a note on the buzzer. First we create a runnable so we can post it to the handler thread. Then we set the frequency the buzzer is going to play the note at. Now we enable the pwm signal to be sent.
We want the note to play for a certain duration for now, let’s say 1 second, use the SystemClock to sleep the thread for 1 second, which means the peripheral will carry on playing the note for that long, and then we disable the pwm signal again, stopping the note.
All of that looks like this, this isn’t our final code but a quick way to prove our Buzzer can play the middle C note:
    private final Runnable playSong = new Runnable() {
        @Override
        public void run() {
            try {
                bus.setPwmFrequencyHz(261.63); // C
                bus.setEnabled(true);
                SystemClock.sleep(1500);
                bus.setEnabled(false);
            } catch (IOException e) {
                throw new IllegalStateException(BUZZER_PIN + " bus cannot play note.", e);
            }
        }
    };
Hook up the runnable to play when the app starts adding code to the onStart method. Have the runnable repeat itself by posting again every time it gets to the end. And for best practice always remember to remove callbacks using the Android lifecycle symmetrically matching method which in this case is onStop.
    @Override
    protected void onStart() {
        super.onStart();
        buzzerSongHandler.post(playSong);
    }

    private final Runnable playSong = new Runnable() {
        @Override
        public void run() {
            ....
            buzzerSongHandler.post(this);
        }
    };

    @Override
    protected void onStop() {
        buzzerSongHandler.removeCallbacks(playSong);
        super.onStop();
    }
We’ll keep a Queue in the MainActivity called SONG and this will hold the notes we want to play. Because it is a queue we can poll the notes, in a first in first out manner. Add the Pokemon Music to our SONG in the onStart method.
    private static final Queue<Music.Note> SONG = new ArrayDeque<>();

    @Override
    protected void onStart() {
        super.onStart();
        SONG.addAll(Music.POKEMON_ANIME_THEME);
        buzzerSongHandler.post(playSong);
    }
We use the SONG queue to determine what note we want to play next. Get the next note from the queue with this code. Now that we have the note, let’s replace playing middle C with the frequency from the Note, also the period is now determined by the note as well.
    private final Runnable playSong = new Runnable() {
        @Override
        public void run() {
            if (SONG.isEmpty()) {
                return;
            }

            Music.Note note = SONG.poll();

            if (note.isRest()) {
                SystemClock.sleep(note.getPeriod());
            } else {
                try {
                    bus.setPwmFrequencyHz(note.getFrequency());
                    bus.setEnabled(true);
                    SystemClock.sleep(note.getPeriod());
                    bus.setEnabled(false);
                } catch (IOException e) {
                    throw new IllegalStateException(BUZZER_PIN + " bus cannot play note.", e);
                }
            }
            buzzerSongHandler.post(this);
        }
    };
One note about the above code. It handles a special case with musical notation. Music has the concept of a rest note, it takes a beat but doesn’t play any sound. So if we need to play a rest beat, we should still pause our thread to wait for the beat but we don’t want to tell the buzzer to play anything.
That’s it!
Let’s run our app and check the rainbow hat to hear the buzzer playing the Pokemon theme tune.
You now understand how the Android Things PWM communication with peripherals works. You can interface with a piezo speaker controlling its duty cycle and frequency, making it louder or quieter and playing notes. This knowledge also transfers to other P W M peripherals such as other types of speakers, servo motors or LED dimmers.
The source is on GitHub and all the code is available here.
If you are more of an audible learner, or prefer video content. You can check out my Android Things introductory video course on Caster.io.