This blog will show you how to use the capacitive touch buttons of the Rainbow hat peripheral. In learning about the capacitive buttons we will use the GPIO protocol which can come in handy for numerous other sensors and peripherals.
Hardware Prerequisite:
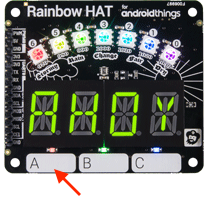
We have the Rainbow Hat connected to the top of our raspberry pi.
Software Prerequisite:
An AndroidThings project already set up in Android Studio, if you aren’t sure how to get your project to this point you can view the ‘first Android Things app’ blog for instructions.
Let’s get started.
First we create an instance of PeripheralManagerService. This is the AndroidThings SDK class that allows us to open connections to different board pins using the different available protocols.
PeripheralManagerService service = new PeripheralManagerService();
Using this instance, we want to open a GPIO connection with the pin address of the capacitive A button. This can be found here. When we open this connection we are given back a GPIO bus variable that will now allow us to communicate using the AndroidThings SDK GPIO class.
public class MainActivity extends Activity {

    private static final String TOUCH_BUTTON_A_PIN = "BCM21";

    private Gpio bus;

    @Override
    protected void onCreate(Bundle savedInstanceState) {
        super.onCreate(savedInstanceState);

        PeripheralManagerService service = new PeripheralManagerService();

        try {
            bus = service.openGpio(TOUCH_BUTTON_A_PIN);
        } catch (IOException e) {
            throw new IllegalStateException(TOUCH_BUTTON_A_PIN + " bus cannot be opened.", e);
        }
   }
}
Opening a connection to a pin is capturing this pin as your resource, and like with all resource management it is good practice to release resources once you have finished with them. Also if we have an open connection to a pin, no other code can open a connection to that same pin until we close our connection.
Since we opened the connection to our pin in the onCreate method, we should use the symmetrically matching pair from the Android Lifecycle to close the connection. Therefore we close the GPIO bus connection in onDestroy using this code.
    @Override
    protected void onDestroy() {
        super.onDestroy();
        try {
            bus.close();
        } catch (IOException e) {
            Log.e("TUT", TOUCH_BUTTON_A_PIN + " bus cannot be closed, you may experience errors on next launch.", e);
        }
    }
Once we have a connection to the GPIO bus, we now have to configure our pin for GPIO input from a button.
We set the direction to IN. This means we are telling the GPIO bus that we expect to use this pin as an input. I.e. we expect to receive information from the peripheral on this pin. (This information can be found in documentation or datasheets like this)
We set the active type to LOW using the below. Active type means the “on” state, when the button is pressed this equates to the pin being active. Describing active type as low means that when there is a low, near zero voltage the GPIO bus value will return true. You’ll see this return of true next when we listen for input.
// in onCreate
try {
            bus.setDirection(Gpio.DIRECTION_IN);
            bus.setActiveType(Gpio.ACTIVE_LOW);
        } catch (IOException e) {
            throw new IllegalStateException(TOUCH_BUTTON_A_PIN + " bus cannot be configured.", e);
        }
When using a GPIO pin as an input you can register a callback for state changes. You create the callback like below. Implementing the onGpioEdge method. If you only want a single callback you return false from this method, however we want to notified every time the button is pressed so we return true.
private final GpioCallback touchButtonACallback = new GpioCallback() {
        @Override
        public boolean onGpioEdge(Gpio gpio) {
            try {
                if (gpio.getValue()) {
                    Log.i("TUT", "ON PRESSED DOWN");
                } else {
                    Log.i("TUT", "ON PRESSED UP");
                }
            } catch (IOException e) {
                throw new IllegalStateException(TOUCH_BUTTON_A_PIN + " cannot be read.", e);
            }
            return true;
        }
    };
The onGpioEdge method is passed the GPIO bus as a parameter, we can use this parameter to determine the current state of the gpio peripheral. When onGpioEdge is called and the GPIO’s getValue method returns false, this means the button has been released.
Let’s now use the callback we have created and register our interest with the Android Things GPIO SDK class.
    @Override
    protected void onStart() {
        super.onStart();
        try {
            bus.setEdgeTriggerType(Gpio.EDGE_BOTH);
            bus.registerGpioCallback(touchButtonACallback);
        } catch (IOException e) {
            throw new IllegalStateException(TOUCH_BUTTON_A_PIN + " bus cannot be monitored.", e);
        }
    }
Add this code to your onStart method to register the callback. We are using the onStart method as we want to be notified of button presses when our Activity is in the foreground only. This is slightly less relevant on AndroidThings as only one application should ever be installed, but it’s still a best practice to future proof your code.
The setEdgeTriggerType method is how we configure what callbacks we want to be notified of. Using the EDGE_BOTH parameter means we will be notified when the button is pressed and also when the button is released. Relating this back to the ActiveType discussion, we will be notified when the peripheral enters the active state and when it exits the active state.
Finally since we registered the callback in the onStart method, we should use the symmetrically matching pair from the Android Lifecycle to unregister. Therefore we unregister our callback in onStop.
    @Override
    protected void onStop() {
        bus.unregisterGpioCallback(touchButtonACallback);
        super.onStop();
    }
That’s it!
Let’s run our app and check the LogCat for the messages showing our button is working.

You now understand how the Android Things GPIO communication with input peripherals works. You can interface with hardware buttons and monitor for state changes knowing when the button is pressed or not. This knowledge also transfers to other GPIO input peripherals such as other types of hardware buttons, motion detectors or light sensors.
The source is on GitHub and all the code is available here.
If you are more of an audible learner, or prefer video content. You can check out my Android Things introductory video course on Caster.io.