This tutorial will show you how you can architect your Android Things applications to make testing much easier. This involves two types of testing: unit and vendor testing.
Google has just announced the amazing Android Things. This gives the Internet of Things (IoT) a real jump start with the availability of the Android ecosystem and all the open source code and ready to use libraries that go with it. You’ll want to start creating an IoT Android Things app as soon as possible but don’t forget IoT devices need testing too.
What we’re going to do:
- create a simple Android Things app that flashes an LED
- ensure the led peripheral code is separated from our business logic
- unit test our business logic
- vendor test the LED peripheral
Note that this blog post does not go too much into the reasoning behind why such an architecture is so good for testing and maintenance. If you want to read more of the theoretical side, check my other blog post here.
The example Android Things code for this tutorial is available here and the code for the peripheral LED is based on the Android Things samples here.
Ok, here.. we.. go.
To create an Android Things project, you create a standard Android app and change two things.
1 – you add a provided dependency to your build.gradle
2 – you add an intent filter to your manifest
We are also going to use the “drivers” for Android Things peripherals in our case the apa102 driver. If you’re using this tutorial as a basis for your project, the driver you include should match whatever hardware peripheral you are using. See here for the full list.
build.gradle:
dependencies {
    compile 'com.google.android.things.contrib:driver-apa102:0.1'

    provided 'com.google.android.things:androidthings:0.1-devpreview'

    // .. other dependencies
}
The intent filter is added to your MainActivity (or the name of the Activity you expect to be the entry point into your application.
AndroidManifest.xml:
<activity android:name=".MainActivity">
      <intent-filter>
        <action android:name="android.intent.action.MAIN" />

        <category android:name="android.intent.category.LAUNCHER" />
      </intent-filter>

      <!-- THIS IS WHAT YOU ADD Launch activity automatically on boot -->
      <intent-filter>
        <action android:name="android.intent.action.MAIN" />

        <category android:name="android.intent.category.IOT_LAUNCHER" />
        <category android:name="android.intent.category.DEFAULT" />
      </intent-filter>
    </activity>
Now we have a running Android Things application. Lets quickly talk about the LED peripheral and our scenario.
What we want to do is, on our board there is an LED and we want it to blink, changing color every 1 second. This is the contract of our LED.
– allow it to blink different colors
– allow the time between color changes to be configurable
With a bit of forward thinking , we also want to release any resources when we have finished with our LED so we can add:
– allow the LED to know when it is finished with.
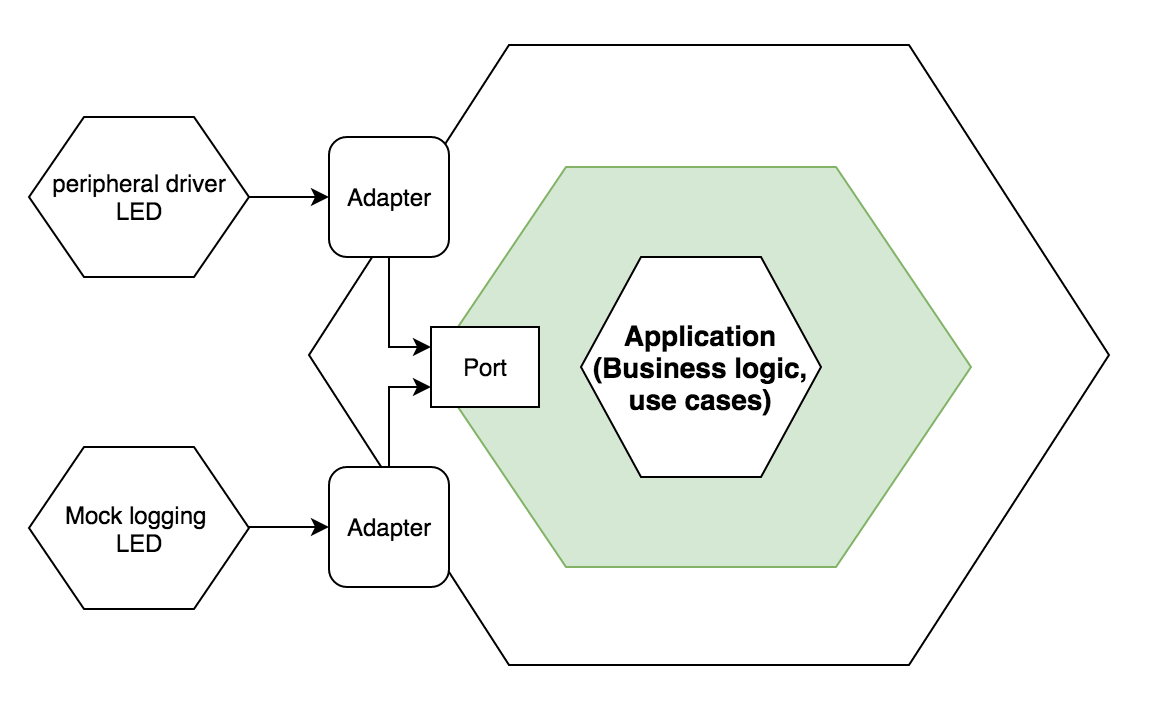
Following the Ports & Adapters design pattern. To create an LED like this we should start with the contract. The following is a Port, a java interface of the contract we discussed above. Notice that the Port does not have any external dependencies as imports.
public interface LedStrip {

    /**
     * Blinks the RGB led strip with the colors
     *
     * @param blinkRate how often to change color
     * @param colors    the colors to blink between
     */
    void colorBlink(long blinkRate, int... colors);

    void close();

}
Now we have a Port we should create the Adapter that will hold the implementation code for triggering the LED. For the sake of this tutorial this code doesn’t matter to much (and it will be different if you are using different hardware) but the fact that we have a contract and we have *some* code that makes that contract work is the important bit. Here is the code but I wouldn’t dwell on it too long:
Apa101LEDStrip.java
package com.blundell.tut;

import android.graphics.Color;
import android.util.Log;

import com.google.android.things.contrib.driver.apa102.Apa102;

import java.io.IOException;
import java.util.concurrent.TimeUnit;

public class Apa101LedStrip implements LedStrip {

    private static final String TAG = Apa101LedStrip.class.getSimpleName();

    // LED configuration
    private static final int NUM_LEDS = 7;
    private static final int LED_BRIGHTNESS = 12; // 0 ... 31
    private static final Apa102.Mode LED_MODE = Apa102.Mode.BGR;

    private final Apa102 driver;

    private int[] ledColors = new int[NUM_LEDS];

    public Apa101LedStrip() {
        try {
            driver = new Apa102(BoardDefaults.getSPIPort(), LED_MODE);
            driver.setBrightness(LED_BRIGHTNESS);
        } catch (IOException e) {
            throw new RuntimeException("Cannot initialise the LED driver", e);
        }
    }

    /**
     * Blinks the RGB led strip with the colors.
     * <p>
     * Assumes to be called on background thread
     */
    @Override
    public void colorBlink(long blinkRate, int... colors) {
        try {
            clear(ledColors);
            driver.write(ledColors);
            TimeUnit.SECONDS.sleep(blinkRate);

            for (int color : colors) {
                setAllToColor(ledColors, color);
                driver.write(ledColors);
                TimeUnit.SECONDS.sleep(blinkRate);

                clear(ledColors);
                driver.write(ledColors);
            }

        } catch (IOException | InterruptedException e) {
            Log.e(TAG, "Error while blinking LEDs", e);
        }
    }

    private static void clear(int[] colorArray) {
        setAllToColor(colorArray, Color.BLACK);
    }

    /**
     * Sets all the elements in the color array to a given {@link Color}.
     *
     * @param colorArray array to be set
     * @param color      an integer representing an ARGB 32-bits color point
     */
    private static void setAllToColor(int[] colorArray, int color) {
        for (int i = 0; i < colorArray.length; i++) {
            colorArray[i] = color;
        }
    }

    @Override
    public void close() {
        try {
            driver.close();
        } catch (IOException e) {
            Log.e(TAG, "Exception closing LED driver", e);
        }
    }
}
Having the code to blink the LED and the contract that is under our control means we can easily replace this hardware, keep the same contract and still have faith that any new peripheral will act in the same way from the perspective of our business logic. Further to this we can replace the hardware Adapter (Apa101LedStrip) with a mock implementation of an adapter (LoggingLedStrip). The benefit of this is that you can still test or run your app without needing the hardware connected. You can switch out which adapter is used using Dependency Injection and/or flags are runtime.
An Adapter that does logging would look like this:
LoggingLedStrip.java
class LoggingLedStrip implements LedStrip {

    private static final String TAG = LoggingLedStrip.class.getSimpleName();

    @Override
    public void colorBlink(long blinkRate, int... colors) {
        Log.d(TAG, "Blink the led strip at rate: " + blinkRate);
        for (int color : colors) {
            Log.d(TAG, "Blink the led strip color: " + color);
        }
    }

    @Override
    public void close() {
        Log.d(TAG, "close the led strip IO");
    }
}
Imagining a real scenario, once you have your hardware peripherals working you would have some business logic that your app needs to do to be able to run. For example, your app may blink the LED whenever a face is detected or the LED changes color depending on the cycle of the moon. In our example here the business logic is much simpler. It is just that “the LED should blink repeatedly.”.
To implement this business logic, we have our MainActivity create a background thread and run our code to blink the LED on this thread in a loop. Let’s take a look at this:
MainActivity.java
public class MainActivity extends AppCompatActivity {

    private HandlerThread pioThread;
    private Handler handler;
    private LedStrip ledStrip;
    private AnimateRunnable animateRunnable;

    @Override
    public void onCreate(Bundle savedInstanceState) {
        super.onCreate(savedInstanceState);

        // setup our background threading mechanism
        // this is used to send commands to the peripherals
        pioThread = new HandlerThread("pioThread");
        pioThread.start();
        handler = new Handler(pioThread.getLooper());
        // instantiate a connection to our peripheral
        ledStrip = getLedStrip();
        animateRunnable = new AnimateRunnable(ledStrip, handler);
        // command the periphal to animate on a background thread
        handler.post(animateRunnable);
    }

    /**
     * As an example in this tutorial, you can toggle peripheral implementations with flavors,
     * could also be done at runtime with shared preferences as an example
     */
    @NonNull
    private LedStrip getLedStrip() {
        if (BuildConfig.MOCK_MODE) {
            return new MockLedStrip();
        } else {
            return new Apa101LedStrip();
        }
    }

    /**
     * this is created for the sake of the tutorial
     * usually you would have more business logic and some model classes
     * these model classes are where your testing would take place
     * but for the sake of the tutorial AndroidRunnableTest.java was made
     */
    public static class AnimateRunnable implements Runnable {

        private final LedStrip ledStrip;
        private final Handler handler;

        AnimateRunnable(LedStrip ledStrip, Handler handler) {
            this.ledStrip = ledStrip;
            this.handler = handler;
        }

        @Override
        public void run() {
            long blinkRate = TimeUnit.SECONDS.toSeconds(1);
            ledStrip.colorBlink(blinkRate, Color.RED, Color.GREEN);
            handler.post(this);
        }
    }

    @Override
    public void onDestroy() {
        super.onDestroy();
        handler.removeCallbacks(animateRunnable);
        pioThread.quitSafely();
        ledStrip.close();
    }

}
And to test the discussed business logic we are adding tests to the AnimateRunnable class.
AnimateRunnableTests.java
public class AnimateRunnableTest {

    @Test
    public void whenRunning_thenColorStripShouldBlink() throws Exception {
        LedStrip mockStrip = mock(LedStrip.class);
        Handler mockHandler = mock(Handler.class);
        MainActivity.AnimateRunnable animate = new MainActivity.AnimateRunnable(mockStrip, mockHandler);

        animate.run();

        verify(mockStrip).colorBlink(1L, Color.RED, Color.GREEN);
    }

    @Test
    public void whenRunning_thenShouldRepeatWhenComplete() throws Exception {
        LedStrip mockStrip = mock(LedStrip.class);
        Handler mockHandler = mock(Handler.class);
        MainActivity.AnimateRunnable animate = new MainActivity.AnimateRunnable(mockStrip, mockHandler);

        animate.run();

        verify(mockHandler).post(animate);
    }
}
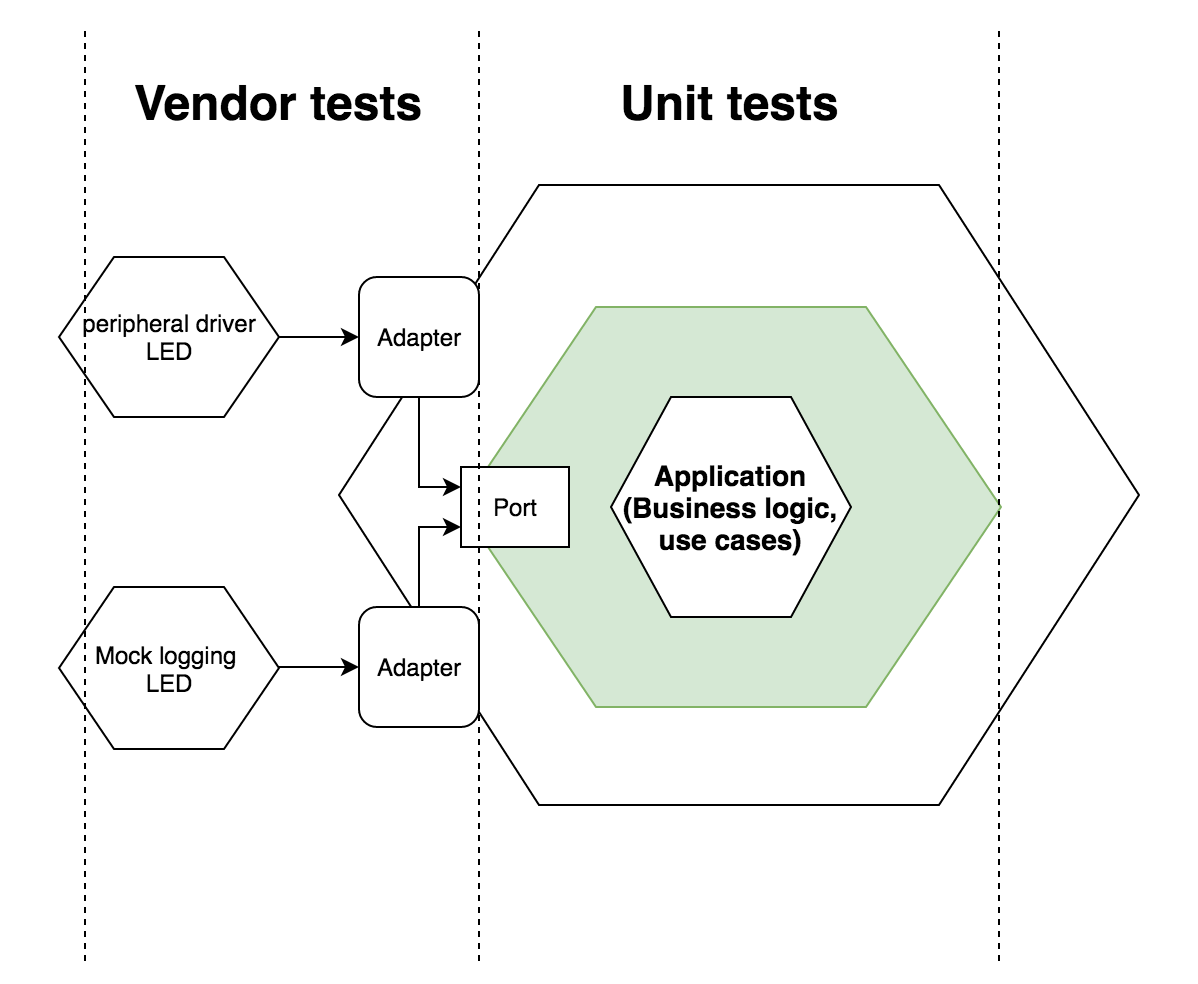
Notice the power of the architecture we are using here. These unit tests only need to be aware of the LedStrip class, they do not need to know about Apa101LedStrip or any of the AndroidThings contrib drivers that it is using. We have decoupled our business logic from the hardware knowledge.
Also within the MainActivity we had the code to select which peripheral implementation we wanted to use. This allows for the swapping of hardware but also the swapping of mock implementations. Powerful when testing the rest of the app manually (exploratory testing) and no production hardware is available.
   /**
     * As an example in this tutorial, you can toggle peripheral implementations with flavors,
     * could also be done at runtime with shared preferences as an example
     */
    @NonNull
    private LedStrip getLedStrip() {
        if (BuildConfig.MOCK_MODE) {
            return new MockLedStrip();
        } else {
            return new Apa101LedStrip();
        }
    }
Vendor testing is an interesting concept that allows you to ensure other peoples code works as you expect. More can be read here. In our example the Vendor Testing is semi-manual, in that the actual assertions of if the LED is working as expected have to be done by your eyes, but having these tests still allow you to script the tests and watch for the results. A more obvious use case for Vendor tests would be input sensors where for example you could assert that a temperature gauge always gives you the same degree of accuracy.
Here are some examples:
public class LedStripVendorTest {

    @Rule
    public ActivityTestRule rule = new ActivityTestRule<>(MainActivity.class);

    @Test
    public void ledsBlinkSingleColor() throws Exception {
        LedStrip ledStrip = new Apa101LedStrip();

        ledStrip.colorBlink(2, Color.RED);

        // manual assertion
    }

    @Test
    public void ledsBlinkAlternateColors() throws Exception {
        LedStrip ledStrip = new Apa101LedStrip();

        ledStrip.colorBlink(2, Color.RED, Color.YELLOW);

        // manual assertion
    }
}
The Vendor Tests are all done through our LedStrip contract and if we decide to change our hardware, the only thing that needs to change in these tests is the class under test, saving us time and giving us confidence that a hardware change does not affect our business rules.
All the code is available here in this GitHub Repository.
That’s it!
As always any questions just ask.
Remember this blog post does not go too much into the reasoning behind why such an architecture is so good for testing and maintenance. If you want to read more of the theoretical side, check my other blog post here.